Cases
A case represents the basic unit of management in the GOV module. Each case is linked to a specific procedure or process that involves handling incoming, outgoing, or internal documents. A case contains key information such as title, description, status, the responsible person, and the documents assigned to the case. The purpose of cases is to enable traceability, transparency, and efficient management of activities related to a specific matter or task in the organization.
Creating a New Case
A new case can be created using the "Add" button or during the process of receiving or creating a new document (incoming, outgoing, or internal).
Creating a case with the "Add" button

When creating a case, the responsible person in charge of resolving the case is specified. A classification code with an appropriate retention period must also be defined when the case is opened.
Adding a Document to a Case
A document is added to a case by locating the case in which it should be placed from the document's attribute.
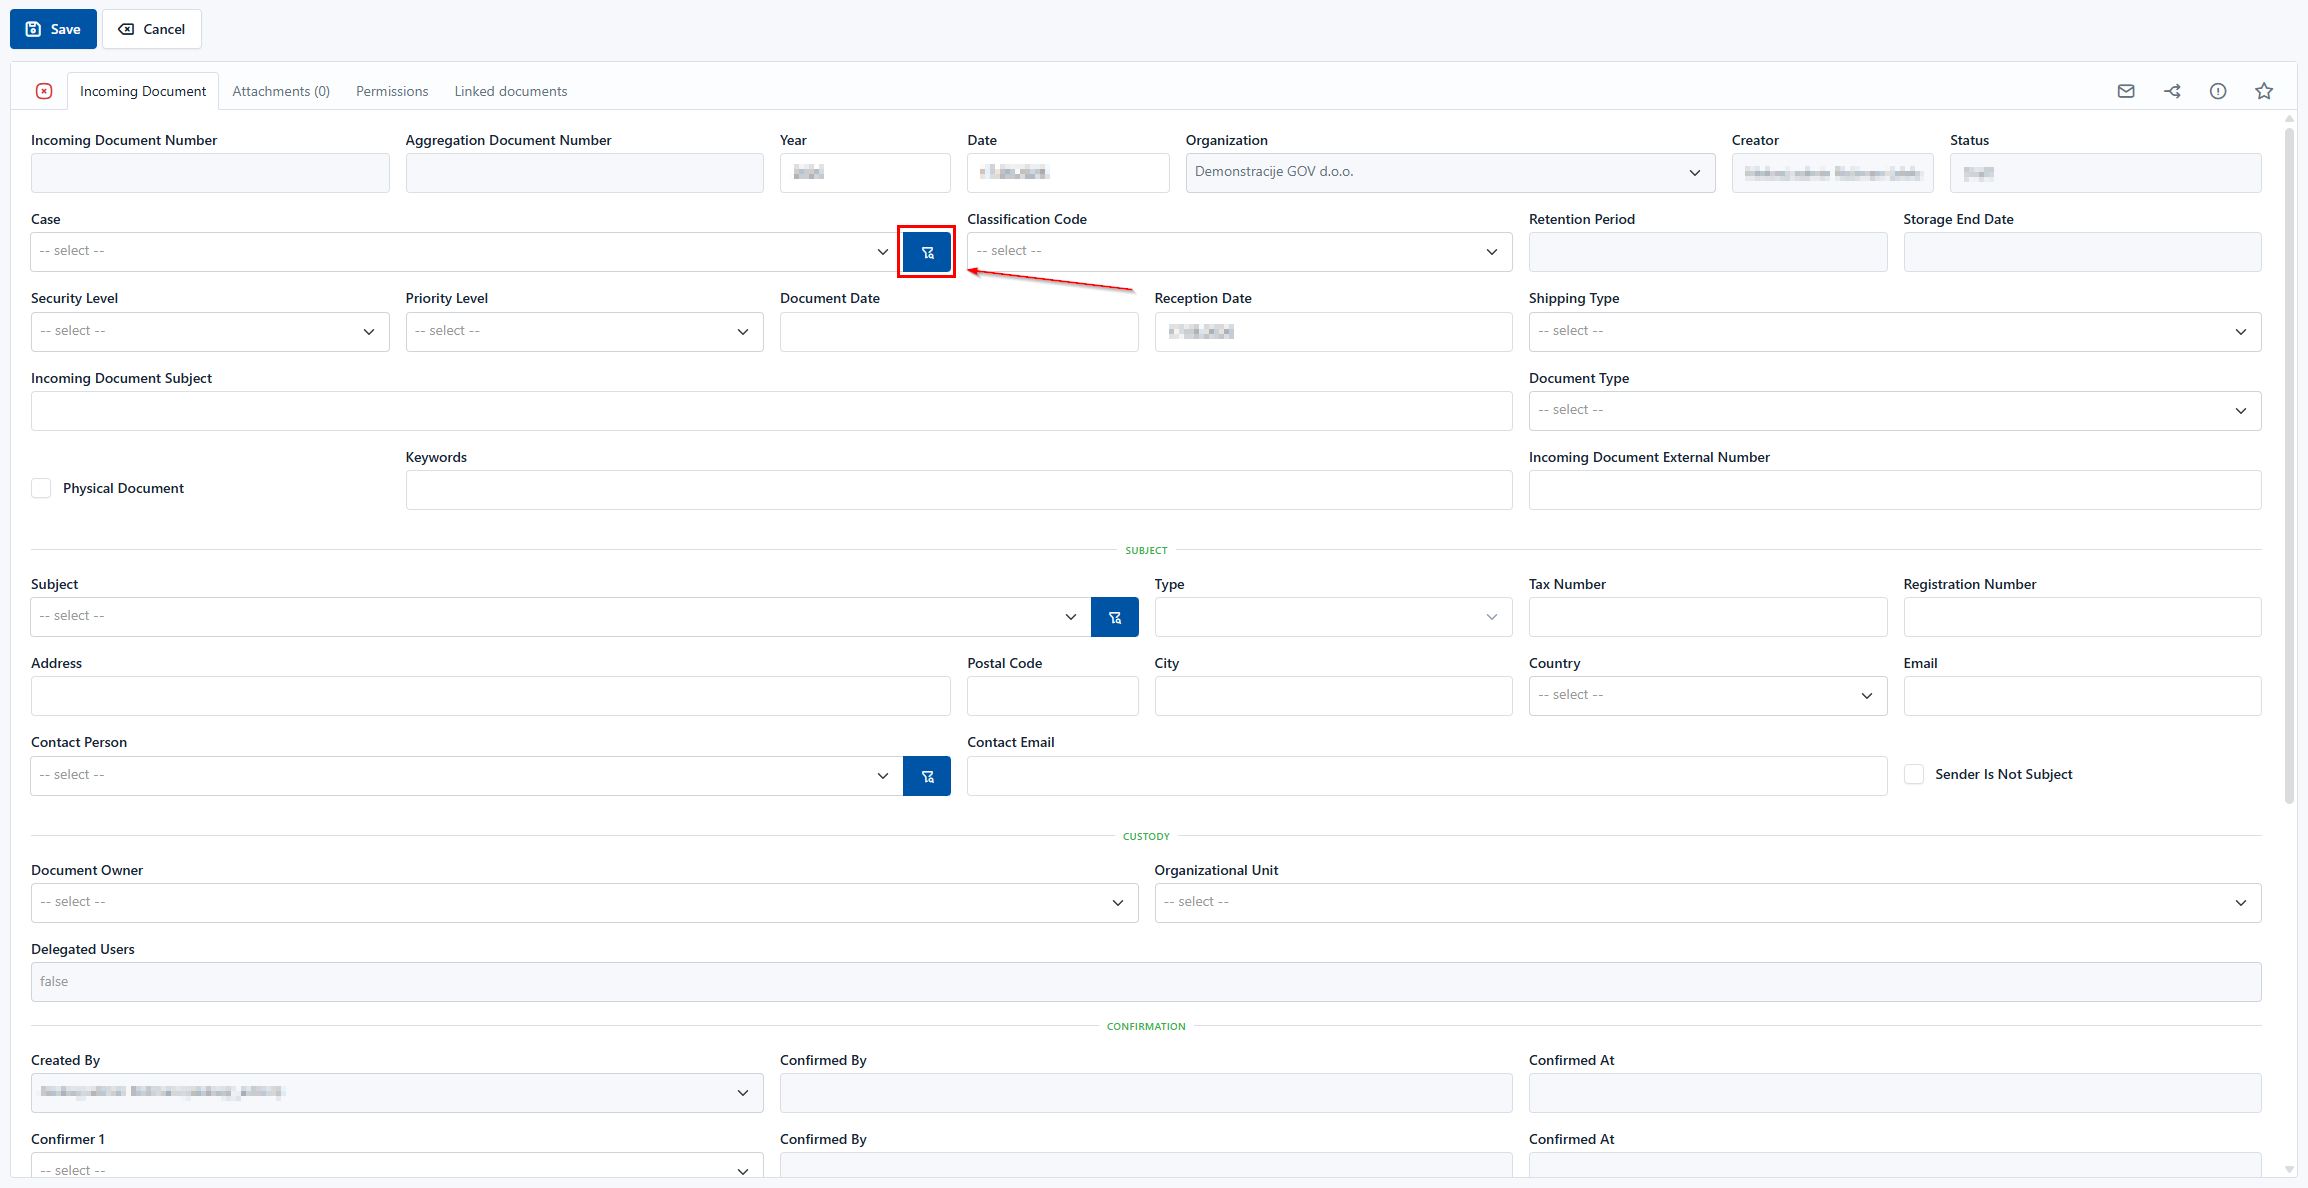
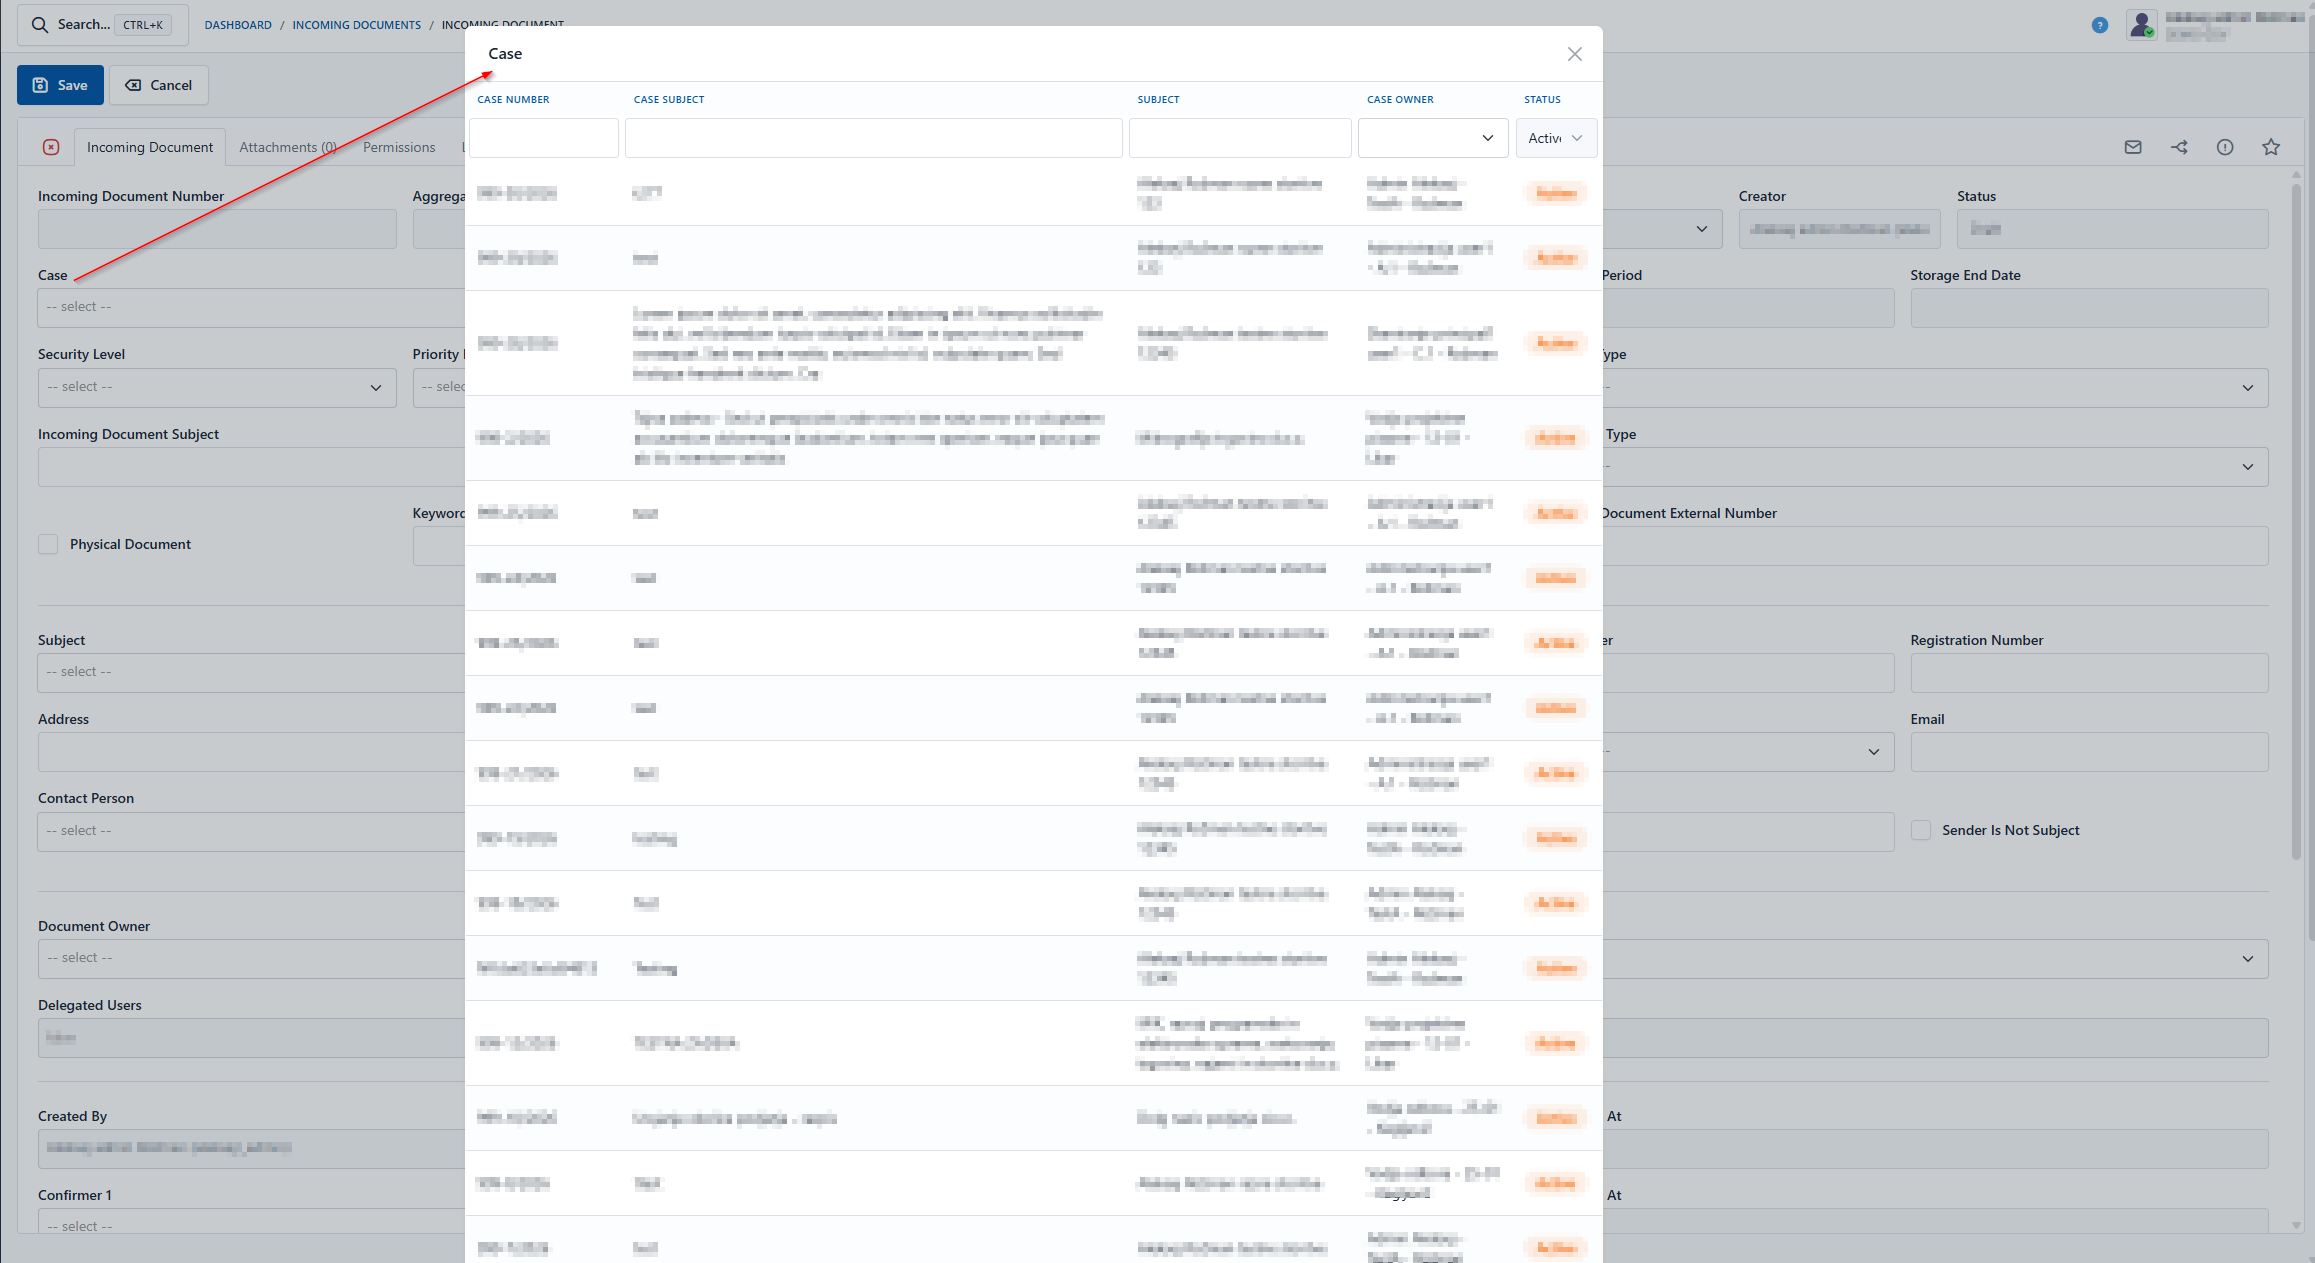
Once a document is added to a case, some metadata is copied onto it from the case.
Important: once a document is assigned to a case, it receives the document's designation within the case, and the selected case can no longer be changed. If a document is assigned to the wrong case, the correction must be made using dedicated actions (e.g., cancel the incorrectly assigned document and re-enter the document, selecting the correct case).
Available Actions:
- "Assign for Resolution" - assigns the case to the responsible person for resolution.
- "Deadline" – moves the case to a waiting state when the responsible person is temporarily unable to continue resolving it (e.g., waiting for additional information or amendments).
- "Resolved" – marks the case as completed once all related documents are finalized and the conditions for closing the case have been met.
- "Cancel" - cancels the case if further processing is no longer required or it was opened by mistake, or in accordance with your organization's work instructions.
- "Add" - add a document, create a document from the case.
- "Reassign" - changes the signing code on the case/documents, and thereby the responsible person, permissions, and approvers.
- "Merge" - joining one case with another, i.e., merging cases.
- "Reclassify" - this action allows the classification code on an existing case to be changed.
- "Case Inventory" - allows an inventory of all documents in the case to be produced.
- "Case Cover" - allows a cover sheet to be prepared and printed for the selected case.
Case Status Colors
Records can be in various statuses throughout the processes. Basic meaning of the icons:
| Color | Meaning | Description |
|---|---|---|
| 🟢 | Resolved | The case is resolved |
| 🟠 | In Progress | The case is being processed |
| 🔴 | Closed | The case was successfully closed |
| 🔵 | Deadline | The case is waiting for additional information or decisions |
| ⚪️ | Draft | A new record with all mandatory metadata |
Assigning a Case for Resolution
The user specified in the Responsible Person field on the case is responsible for resolving the case. By entering the Responsible Person field on the case, the case is assigned to that person for resolution.
The assignment functionality also works at the level of an individual document. When you assign the handling of an incoming document to a responsible person, the associated case is automatically assigned to that person at the same time.
The task of the user opening the case is to:
-
Define the classification code with an appropriate retention period
-
Determine the responsible person (employee) to whom the case will be assigned for resolution
-
Determine other data relevant to creating the case
In Progress
While a case is in progress, most of the actions that can be performed on a case are available.
Actions:
- "Add" – allows adding a new incoming, outgoing, or internal document to the selected case. In doing so, some case metadata is automatically transferred to the document, which simplifies and speeds up data entry.
- "Resolve" – marks the case as resolved if all related documents are finalized.
- "Deadline" - while the case is in progress, it can be set to the "Waiting" status.
- "Cancel" – cancels the case if further processing is no longer required, or in accordance with your organization's work instructions.
Deadline
Deadline is an action used to place a case into a "waiting" state, when the responsible person is not resolving the case but is waiting for some other prescribed procedure to be carried out, such as waiting for an application to be supplemented. While on a deadline, a case is not edited, nor are new documents assigned to it.
Resolved
With the "Resolved" action, the user indicates that the case is finalized. The condition for performing this action is that all documents assigned to the case are finalized.
When performing the resolved action, the following must be defined:
- "Resolution Method" – how the case was resolved.
- "Resolution Date" – when the case was resolved and the date from which the retention period is calculated.
- "Retention Period" – the expected period during which the case must be retained.
Reactivating a Case
Users with defined additional permissions can reactivate a case, which means it goes back into progress. A reason for reactivation must be entered.
Administrative Procedure (ZUP)
The process of managing a case conducted under the administrative procedure (ZUP) has certain specifics that affect the calculation of dates and administrative statistics.
The person responsible for the case, or the head of the organizational unit, decides during the assignment of the case for resolution whether the case must be conducted under the ZUP procedure. In that case, they mark the "Administrative Procedure" field on the case. A tab with additional fields intended for tracking resolution and administrative statistics is then displayed on the case.
Reassignment

User Permissions
Users who are allowed to perform reassignment on a case are:
- Responsible persons
- The registry group (GOV settings)
- Authorized users of the organizational unit (users/signing codes listed in the "Group with access to all documents" field of that unit - by default the head, permanent deputy, secretariat)
- Users with the administrator role
Options for Setting and Changing
Reassignment is performed for the Case document type and includes the case as well as the documents in the case (by default, the following are included: incoming documents, internal documents, outgoing documents. Including other document types is subject to specific environment customizations of mDocs+).
When performing a reassignment, the user specifies on the case:
- Change of access rights for the current responsible person (options: remove all access, keep all access, keep access to documents)
- Change of rights for the holder of the signing code (options: remove access, keep access)
- A new responsible person
- Optionally:
- a new organizational unit: by assigning a new organizational unit, access to the case and the documents in the case is granted to the signing codes specified in the "Group with access to all documents" field of that unit. If the field is left empty, the case/documents remain signed to the existing organizational unit.
- the option to notify the user by e-mail (notifying users for each new task they will take over from the current signing code)
- a comment (the entered comment will be recorded in the case's Workflow)
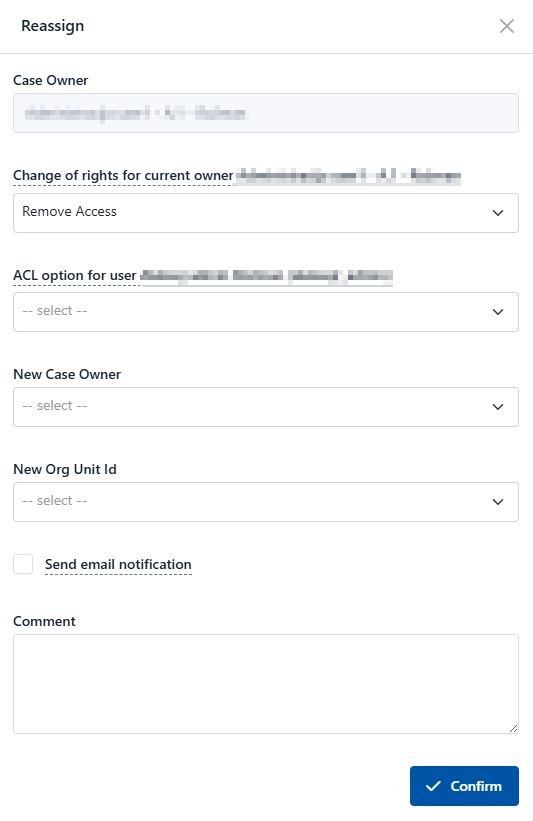
During reassignment, the following fields are updated with the new signing code (depending on the choices made during reassignment):
- responsible person (field)
- organizational unit (field)
- permissions (Permissions tab)
- approvers (Approval section): approvers change only for steps of the process that have not yet been completed
Reassignment also changes the tasks in the workflow. Process steps that have not yet been carried out are reassigned. Tasks that are already open are not reassigned. Fields, approvers, and permissions change both on the case and on its documents.
The following options are available for managing the rights of the current responsible person:
-
change of the responsible person's access rights: this change affects the addition/removal of the existing responsible person's signing code in the Permissions tab. The following options are available:
- Remove all access: the current signing code will lose access to the case and all documents in the case (in the user interface, it will be removed from the Signing Codes section on the case and all documents in the case).
- Keep all access: the current signing code will retain access to the case and documents in the case (in the user interface, it will remain listed in the Signing Codes section on the case and all documents in the case).
- Keep access to documents: the current signing code will be removed from access to the case, but will retain access on the documents in the case (in the user interface, it will be removed from the Signing Codes section on the case, but will remain listed on all documents in the case).
-
change of access rights for the holder of the signing code (holder's username): this change affects the addition/removal of the existing signing code holder's username in the Permissions tab. The following options are available:
- Remove access: the username of the current signing code holder will lose access to the case and all documents in the case (in the user interface, it will be removed from the Users section in the Permissions tab for the case)
- Keep access: the username of the current signing code holder will retain access to the case and all documents in the case (in the user interface, it will remain listed in the Users section of the Permissions tab).
After performing the reassignment action, the person who carried out the reassignment receives a report on its execution by e-mail.

Merging
This refers to joining one case with another, i.e., merging cases. In this process, all documents in the case must be in a final workflow status. The action can only be performed by the responsible person for the case, and only on a case that has the status "In Progress", not on cases with the status "Draft", "Cancelled", or "Resolved".

Performing the merge action:
- In the list of cases, select the desired case on which you are the responsible person.
- Use the "Merge" action.
- The first field contains the name of the current case (the "Case" field), which cannot be edited.
- In the New Case field, select from among the cases that have the status "In Progress" (the selected case will become the new merged case).
- In addition, two optional choices are available (both are unselected by default):
- Cancel the case after merging (in this case, the status of the original case becomes "Cancelled", otherwise "Resolved" upon the merge action)
- Transfer rights to the new case (all users are transferred to the newly selected case)
- Entering a comment is mandatory before confirming.
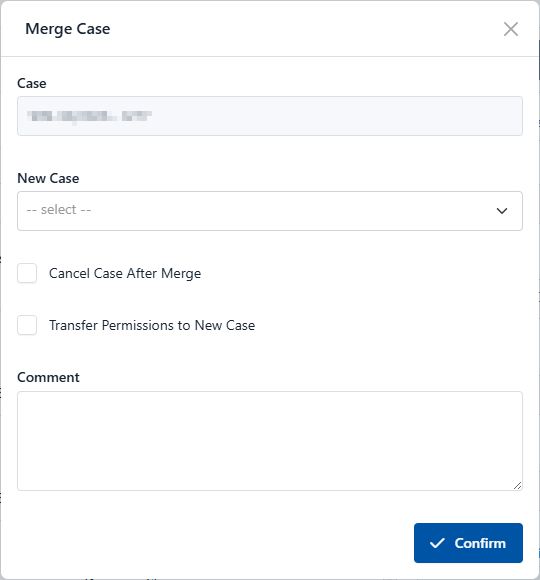
During merging, all data transferred from the case is copied/overwritten (this also applies to all documents in the case):
- subject
- classification code
- responsible person
- organizational unit
- confidentiality level
- new permissions from the new case are added to the joined documents.
All documents from the original case are reclassified into the selected new case.
The data change is visible in the audit trail in the Workflow (date and time, author of the change, operation, and a comment with default content "Case [mark of original case] merged into case [mark of new case]."), on both the original and the newly selected case.
Reclassification
This action allows the classification code on an existing case to be changed. Reclassification is only possible on cases with the status "In Progress".
In this process, all marks are renumbered (the "Document No. in Case" field). The metadata "Previous Case Mark" or "Previous Document No. in Case" is added, which is empty except in the case this action is performed - the old mark is entered into this field, and the new mark is entered into the "Case Mark" and "Document No. in Case" fields.

Performing the reclassification action:
- In the list of cases, select the desired case on which you are the responsible person.
- Use the "Reclassify" action.
- In the New Classification Code field, select from the available options.
- Entering a comment is mandatory before confirming.
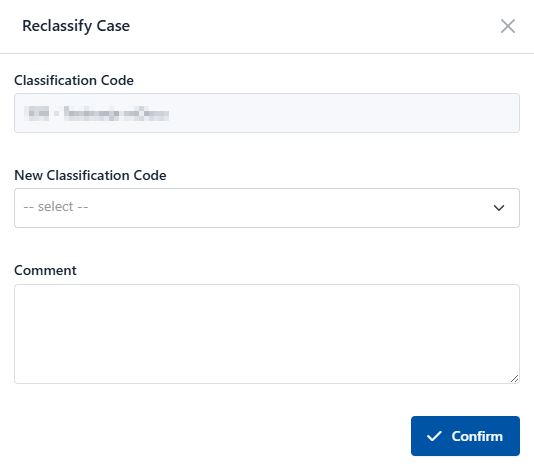
Reclassification must be reflected in the audit trail (author, date, predefined entry for the action "Reclassification from classification code [old code] to new classification code [new code].", entered comment).
Case Inventory
Case Inventory allows the generation of a printout listing all documents in the case. When the action is performed, the document is automatically generated along with the list of all documents and some other case metadata. The "Case Inventory" button is visible only on cases with the status "Draft" or "In Progress", since only in that case is the action enabled.

Preparing the Case Inventory
- In the list of cases, select the desired case on which you are the responsible person.
- Use the "Case Inventory" action.
- The system will automatically create a document with the case inventory printout, containing the selected metadata.
- The prepared document is automatically downloaded when the action is performed.
Contents of the Case Inventory
The case inventory includes the following metadata:
- Sequence number of each document in the case
- Content of the document (title)
- Document date
- Indication of whether the document is in physical form
- Any classification level.
In addition, the case inventory contains some other metadata:
- Case title
- Case mark
- Name of the person who prepared the printout
- Date of the printout.
Case Cover
The Case Cover is a feature that allows a cover sheet to be prepared and printed for the selected case. When the action is performed, the document is automatically downloaded. The action is available on cases with the status "Draft" and "In Progress".

Preparing the Case Cover
- In the list of cases, select the desired case on which you are the responsible person.
- Use the "Case Cover" action.
- The system will automatically create a document with the case cover printout, containing the selected metadata.
- The prepared document is automatically downloaded when the action is performed.
Contents of the Case Cover
The case cover includes the following metadata:
- Case number
- Case title
- Case subject
- Retention period
- Classification level
- Data about the responsible person (Signing code).
Other Information
On a Case, the Permissions tab includes an option that allows the responsible person or the creator of the case to mark the case as visible for selection to all users in the field where an incoming, internal, or outgoing document is assigned to a case.
Thus, if the responsible person selects this option, they allow all users (even if they do not have direct permission to access this case) to assign a document to this case (see the description in images 1 and 2 below).
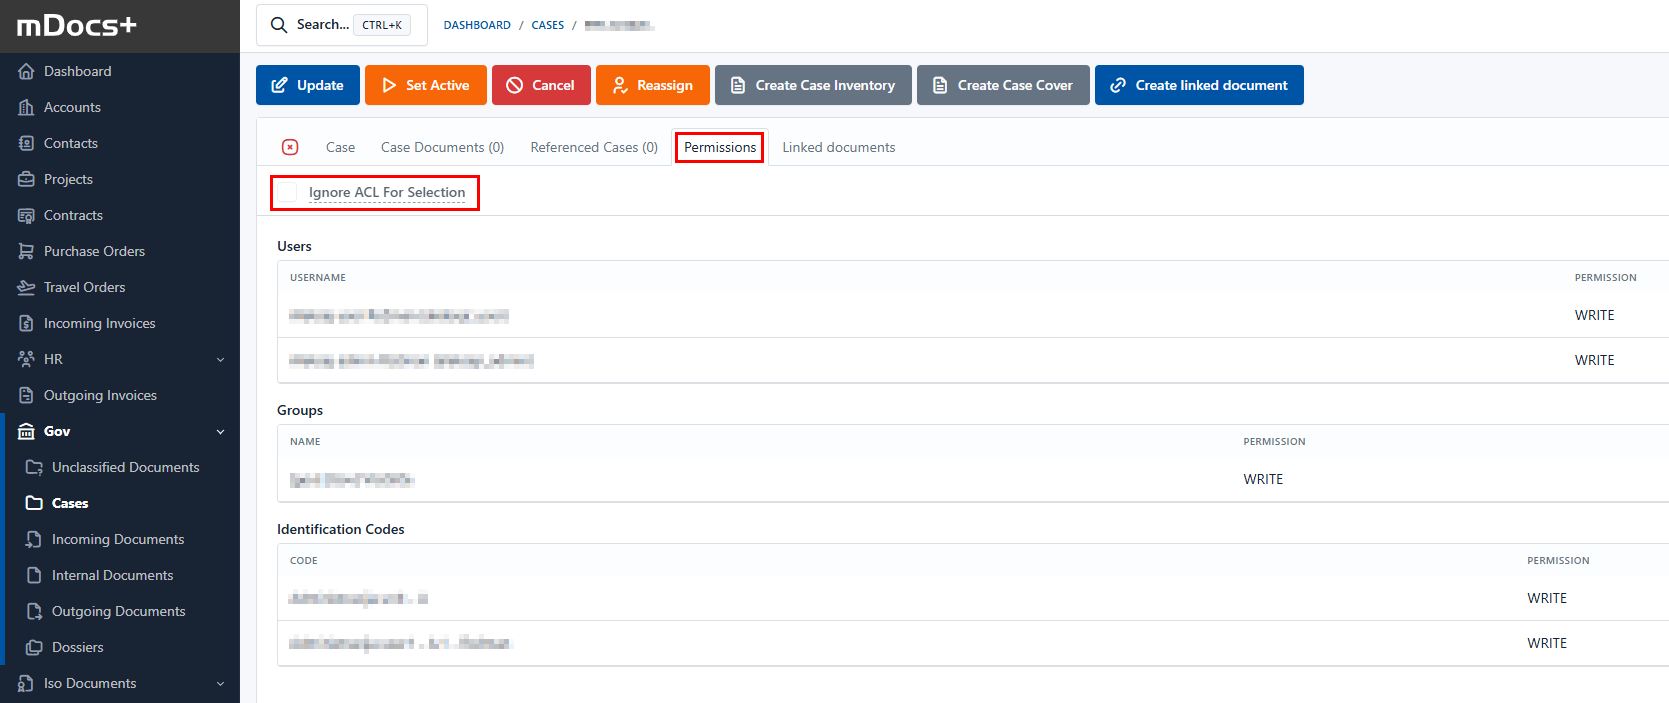
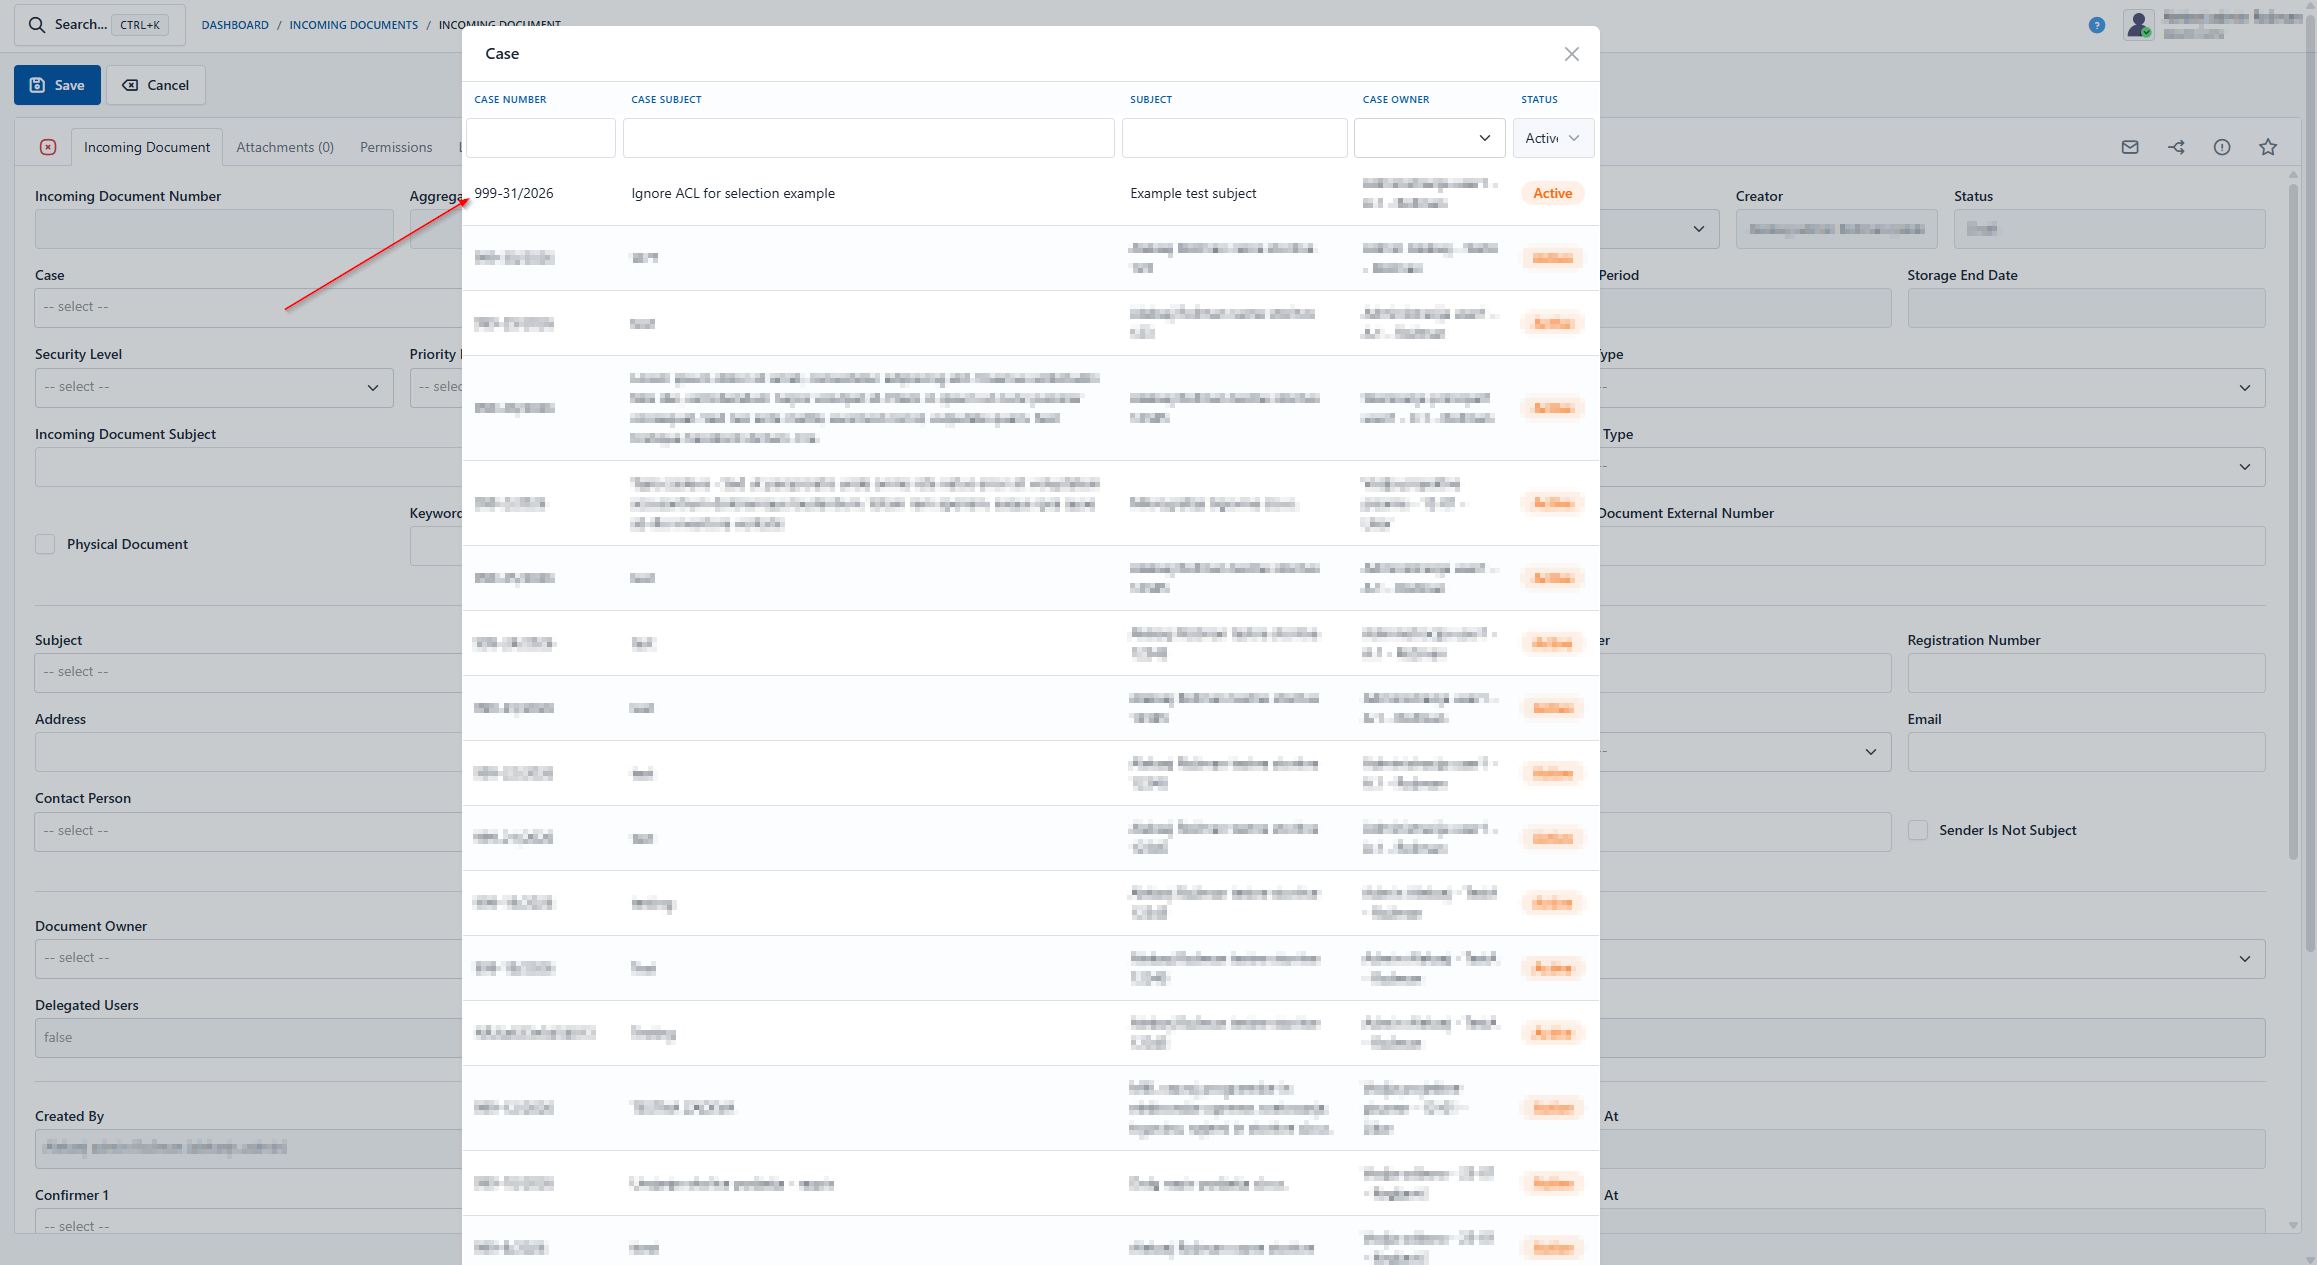
Searching for the case in other places remains restricted by permissions. This means that in the Gov – Cases menu, etc., such a case will not be visible to all users, but only to those with the appropriate access permission. Access to the case and viewing the documents within it also remain restricted.
The added value is that a user can see whether a case already exists and assign a document to it, even if they otherwise do not have access to it.