Creating and saving documents
The document system allows for easy creation of new documents.
How to create a new document
Steps for manually creating a document:
-
In the selected module, click the "Add" button.
-
Fill in the mandatory fields (marked with an asterisk), e.g.:
- Document title
- Date
- Case, reference, subject, etc.
-
Add:
- document content (e.g. an uploaded file),
- attachments,
- comments or notes.
-
Click "Save" to record the document in the system.
The available options depend on your organization's configuration.
Drag & drop document creation:
-
Selecting an item
Drag one or more files from your computer or email client into the dedicated "Drag and drop" area, located at the bottom of the navigation menu or another supported form. -
Determining the document type
After dropping the items, the system will prompt you to select a document type, which determines its processing, metadata form, and further use in processes. -
Confirmation and further processing
After selecting the document type, click "Confirm". The system redirects you to the document form for adding the document, where you will find:- all attachments included,
- pre-filled fields (if data is recognized),
- further customization or processing of the document enabled.
-
Add:
- document content (e.g. an uploaded file),
- attachments,
- comments or notes.
-
Click "Save" to record the document in the system.
The available options depend on your organization's configuration.
Uploading emails using drag and drop
The document system allows for easy addition of emails (and attachments) via the "drag and drop" functionality, allowing the user to quickly save important business communication directly into a document or case.
- In Outlook (or another email client), find the desired email.
- Click it with the left mouse button and drag it.
- Without releasing the button, carry the email to the Drag and Drop area in mDocs+
- Release the mouse button – the email uploads and a window is displayed:
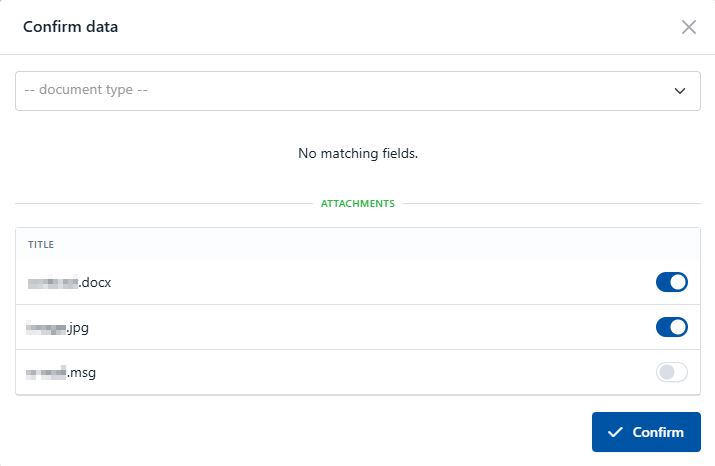
- Select the document type and mark the items you want to upload to the system. Then click Confirm.
Editing and further steps
After creating a document (manually or from a template), the user can:
- forward the document for signing (e.g. via mSign),
- add attachments or comments,
- change metadata,
- include the document in further workflow (e.g. approval, distribution).
The available options depend on your organization's configuration.
Saving documents
Saving a document means that the document, together with all its associated data (content, metadata, attachments, audit trail), is permanently recorded in the document system and becomes accessible to users with the appropriate rights.
What gets saved?
When saving, the following are recorded:
- document content,
- attachments,
- metadata (document type, date, reference, case, ...),
- information about the author and time of entry,
- audit trail.
The available options depend on your organization's configuration.
Document statuses after saving
After saving, the document receives an appropriate status, depending on the document's settings and process flow, such as:
- "Draft",
- "Pending approval",
- "Pending signature",
- "Valid",
- "Cancelled".
The available options depend on your organization's configuration.